Thursday, October 23, 2008

Japanese Beading Book

This is the cover of a Japanese beading book. At the beginning, there is a gallery of colored pictures of flowers and bouquets. The interesting thing about this book, though, is that it includes a few pictures of non-flower things which are made using French beading. To give you an idea of what is possible, I've included those pictures which illustrate this. The pictures have very high resolution (so you can really see the details) and therefore will take some time to download. The patterns in the book are black and white and are for rather basic flowers and do not contain any instructions for most of the flowers showcased.

Wednesday, October 22, 2008

New Pears

First, I would to apologize for not updating for so long. If anyone is still reading, thank you.
So, here we have two new pears. They were an experiment to see if I could make self-supporting 3D French beaded objects. As it turns out, it is possible, since both of the above examples are completely hollow and do not have any solid form beneath the beads, unlike the first pear I made.
The process to make them is the same as the first one; I used a light air-drying compound similar to Crayola Model Magic to make the pear shape. The pear on the right is made by beading around the shape using the basic frame (24 gauge wire; 2-bead basic). The one on the right is made crossing 2 24-gauge wires (to make a cross frame) and then beading around the frame using 26-gauge wire. After the pear is beaded, the hardest part of the process is removing the form from inside. I did this by sticking needle-nosed pliers into the small opening I left at the top and pulling out bits and pieces of the modeling compound. This was very time consuming, but I eventually finished, and there they are!
The two pears were made differently because I was worried about their stability after I removed the support. As it turns out, the pear on the right is rather flimsy. Even though I laced the sides that were seamless, it is still rather fragile. It holds its shape, but it can still get deformed fairly easily under stress (i.e., if one picks it up and plays with it).
The pear on the right is much more stable. Even though the wire with the beads is 26-gauge, because it was built on a 4-spoke frame, it can hold its shape under mild stress. Even so, it's not quite as stable as I would have liked.
I am working on another pear right now which is made from a quadruple basic frame using 24-gauge wire. So far, it seems to be the most stable!

Saturday, March 31, 2007

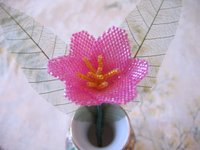
Stocking Orchid

A little pink orchid from my imagination =) The petals are all made by making a wire loop and then covering the loop with pink stocking. The middle petal uses a coil loop before covering. The three outer petals are outlined with pink glitter glue, while the two middle petals are highlighted with white glitter glue.
Stocking flowers are very easy to make and can be lovely fillers in a beaded flower bouquet.
To see some gorgeous arrangements of flowers made like this please see Flowers of Thailand.

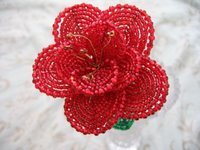
Netted Rose

This little netted rose is made from size 11 seed beads and a thin nylon line (like that used in fishing). The pattern comes from the Russian magazine Wonderful Instants (Vol. 3 Issue 19). This bead journal is quite nice and issues may occasionally be available on e-Bay. The patterns have many clear pictures and the details are written in Russian. This is one component of a lovely beaded necklace.
By making this project, I realized that the nylon line isn't very good for off-loom stitches. It is strong, but not flexible like regular thread. The best thread to use is Silamide, which is also made of nylon, but it is thin, flexible, and available in many colors.

Angel

This angel is made of teal half-bugle beads. The pattern is from Flower Beading French Technique Book 2 by Bobbe Anderson. I used a small Styrofoam ball for the head instead of a wooden bead as is suggested in the pattern. This is a really nice, simple project.

Sunday, February 25, 2007

French Beaded Pear

This French beaded pear is a little smaller than 2 1/2 inches (~6.25 cm). I wanted to see if it was possible to make one without a form inside it; however, I wasn't able to get the right shape. I finally decided to go and buy a Styrofoam pear, but I couldn't find any that were small enough. Instead, I used a modeling material called Model Magic by Crayola out of which I made a pear shape. This material is very good for this sort of thing because it air dries quickly (about 1 day) and it remains lightweight and somewhat soft after drying.
I then followed the general instructions from the Bobbie Anderson book I mentioned last post: using a two bead basic and wrapping around the bottom loop and top loop (I made a loop in place of the top basic wire). I didn't use any glue though because it changed the color of my beads slightly. Since they aren't glued down, some of the rows are a little bit off and don't stay in place. I think this can be avoided if the rows are wrapped tightly.

Sunday, February 11, 2007

Unfinished Strawberries

I don't normally post pictures of unfinished projects, but I'm not sure when I'll be able to finish the strawberry plant I've been working on. The strawberries are based on Virginia Nathanson's strawberries from New Patterns for Bead Flowers and Decorations. All strawberries have a two bead basic are made using the cup technique. They are all made free form because I didn't like the size and shape of the pattern in the book. Also, there is no support shape within them.
Recently, I've developed an interest in beaded fruit. I've found several books that detail methods for making them. I suggest using the instructions in the first two books for completely French beaded fruit.
  1. Bead Design by Ruth Wasley and Edith Harris.
    • Fruit patterns: apple, banana, crab apple, grape cluster, kumquat, lemon, orange, pear, pineapple, plum, strawberry plant.
    • Technique: making 3 or 4 petals which are twisted together to give the shape of the fruit (please see the grapes post). The fruits are between two to four inches, and there is a small plastic fruit placed inside to help keep the shape.
    • Other: The tortoiseshell mirror and Victorian picture frame are made of several components, one of which is several berries. These are made in the cup method. They do not have a solid support shape inside them.
    • Overall: This is probably the easiest way of making French beaded fruit. If you want to make a fruit that is a different size from the one specified in the pattern, it may require quite a bit of experimenting.
  2. Flower Beading French Technique Book IV by Bobbe Anderson
    • Fruit patterns: no actual patterns, just very broad and general instructions on how one could bead a fruit. There is a small black and white photo and the fruit shown are pears, apples and strawberries.
    • Technique: The fruits have a two bead basic and a long basic wire and basic loop. You are to bead a few rows and then glue this to the bottom of a small Styrofoam fruit (about 3 inch circumference). Then, using straight pins and a little bit of glue to hold the beading in place, you proceed as if using the cup method around the form.
    • Overall: Wrapping around the basic wire and bottom loop can look nice no matter what shape you use. You will have to use a little glue occasionally to make sure your beads stay in place on the rounded fruit.
  3. Making Bead Jewelry and Decorative Accessories by Virginia Nathanson. This book is also known as The Pearl and Bead Boutique
    • Fruit/vegetable patterns: strawberry (same pattern as in New Patterns for Bead Flowers and Decorations), pumpkin, eggplant, carrot, artichoke, radish, green pepper, Lima beans, green peas, mushroom, tomato, corn.
    • Technique: only the strawberry (cup technique), artichoke, pumpkin, green pepper, Lima beans and green peas are made using the French beaded technique. All other vegetables are made by gluing beads directly onto a Styrofoam/plastic shape of the fruit. For an example of making fruit this way, please see this very lovely Italian site: La Bottega Artistica.
    • Overall: Gluing beads onto a form is easier compared to wrapping (like in the Anderson book) and it looks neater too. However, it's not considered French beaded.
  4. Beading: Basic and Boutique by Barbara L. Farlie
    • Fruit/vegetable patterns: grapes (sewed to a purse), pea pods, marzipan strawberries, sugared grapes, Easter lemon tree, fruit compote. Only the grapes and the pods of the peas are made using the French beaded technique.
    • Technique: the grapes are made with the dome method, but only half of the grape is made since it is sewn onto a purse. Each grape is stuffed with a small cotton ball.
    • The rest of the fruit: The peas of the pea pods are large pearls. The sugared grapes are plastic grapes that are sprayed with adhesive and then have crushed beads sprinkled on them. The strawberries made of beads glued onto a strawberry form. The Easter lemon tree and fruit compote (which includes a variety of fruit) are made by pinning plastic faceted beads into a plastic fruit shape. For an example of this please see this site.
    • Overall: I included this book because I found the pin beaded fruit quite interesting. It is very time consuming and probably the most difficult way to make beaded fruit, but it's also rather nice.
Making French beaded fruit can be quite a challenge (there are also other ways to make beaded fruit, and that's why I've included the last two books). When a French beaded flower gets knocked over or bent out of shape, it is easy to reshape the relatively flat petals. If you make something three dimensional like an apple or pear, then you almost certainly must include some sort of support shape such as a Styrofoam version of the fruit within the beading. I prefer beading fruit using the method described in the Anderson book: the cup shape around a form. Also, Donatella Ciotti's book Beadwork has beaded grapes which are made by beading around a cross frame.

Monday, January 08, 2007

Sea Holly

The pattern for this Sea Holly is from Flower Beading French Technique Book 4 by Bobbe Anderson. I found it interesting to make some of the petals out of loops. The first two layers of petals are not continuous loops, but rather they are built on the "stem" that is created when the first loop is twisted closed.
I also tried my hand at making a beaded stem since the pattern calls for this. I followed the pattern and wrapped the first half of the stem, then added the leaves, and lastly, wrapped the remaining length of the stem. When I added the leaves, however, I ended up making the part of the stem that was directly beneath them thicker than the stem I had already covered. Other than the stem, I am happy with the flower. The looped petals are pretty and playful and the colors ended up working well together.

Gladiola

The pattern for this Gladiola is from Bobbe Anderson's Flower Beading French Technique Book 3. The bottom florets ended up being quite heavy, and so the stem cannot stand on its own. I think it would look nice as a wall hanging, and I am planning on doing that sometime in the future. All in all, it was an interesting project.

Sunday, January 07, 2007

Grapes

This grape vine is from the Japanese book Crystal Beads Flowers. This book can be bought from Amazon.co.jp, or from eBay, which is where I bought it from. The arrangements in this book are very beautiful and presented differently than those in American books. The patterns are black and white and in Japanese. Each pattern also has several black and white pictures which help explain the creation process.
I chose the grapes pattern because I wanted to make something other than a classic French beaded flower. The grapes are made from 3 small "petals" which had their basic wires and stems wound together after completion. The grapes are also supposed to have a small 1 cm Styrofoam ball inside them to keep their shape. I omitted the Styrofoam balls since I couldn't find them in such a small size. Because of the way they were made, some of the grapes are a bit pointy.
While the shading on the leaves isn't very realistic, I like the overall shape and look of the vine.

Tuesday, October 10, 2006

Cyclamen

The instructions for this beaded cyclamen are (once again) from Flower Beading: French Technique Book IV by Bobbe Anderson. I chose this pattern because of the unique leaf. Many of the flower patterns that I've seen in today's books try to replicate flowers as closely as possible. That's certainly a good idea; however, when I noticed this cyclamen's stylized leaf, I knew I had to make it. The petals and center are simple: continuous loops and basic petals. The stem is covered with metallic thread.

Peyote Butterfly

The pattern for this butterfly was designed by Karole Conaway and is from her website: The Glass Butterfly, Etc. which a very nice site featuring many impressive beaded butterflies and other pretty jewelry items. The project was done in flat peyote stitch with size 11 Toho treasure beads. For increasing and decreasing on the edges, I referenced the beadwork section from about.com. This is the Christmas butterfly from the free pattern section.

Sunday, September 24, 2006

Peyote Tulip

A while ago I decided that I wanted to make a peyote flower, but I didn't have a particular flower in mind. Then a friend suggested that I make a tulip. A tulip seemed like a simple enough flower: 6 rounded petals and one long leaf. I decided that I wouldn't follow a pattern, and chose to rely on my imagination. The flower, unfortunately, didn't turn out to be as simple as I thought. I started beading before I looked at pictures of tulips up close. I realized that the top of the petal is actually wider than the bottom. In order to compensate for the fact that I had beaded the flower the other way around, I ended up having to turn all the petals upside down.
As for the leaf, I knew it was going to be large; and, I'm also fairly certain the one I have here is too small. I used size 10 Czech beads for the leaf as opposed to the 11/0 Toho treasure beads used for the petals. The Czech beads enabled me to finish more quickly, and gave the leaf a more natural, less delicate look. The leaf broke, unfortunately, so I substituted artificial foliage made from paper.
This was certainly a fun and interesting project, but I will try to plan ahead more next time.

Saturday, September 16, 2006

Stocking Rose

Stocking flowers are not quite beaded flowers, but still very beautiful. I recently found a lovely website: Flowers that Last, which is an Australian site. They have a beautiful gallery, and their kits page is very inspirational also. These flowers are very beautiful and very easy to make: simply make a wire loop, cover with colored nylon stocking, shape it and you have a very pretty petal. The flowers look quite realistic and make beautiful decorations.
Here is a small rose of my own design which has been pinned onto a shirt.

Azalea

The pattern for this azalea and bud comes from Flower Beading: French Technique Book IV by Bobbe Anderson. The book is unfortunately out of print as it was copyrighted in 1970. I was rather surprised at the difference in pattern instruction quality as compared to today's books. (This was my first "vintage" book). The patterns are text only, accompanied by a black and white photo of the finished flower. The inside of the front and the back cover of the book, however, feature colored examples of many of the flowers.
I chose to do the azalea because its design is very unique. To make the final row of the basic petals, beads that are slightly larger are alternated with the ones that have been used to make the rest of the petal. "On the last 2 rows of the petal [you are to] alternate 9/0 or 8/0 beads with 11/0 beads, 1 and 1". I was using size 10 (Czech) beads, so I chose to alternate with size 6. As I was making each petal, though, I didn't realize how big the overall flower would be since I do not have a lot of experience. I was quite surprised when I finally had it all put together! I tried to ruffle the petals by bending, but it really looks more like a large rose or hibiscus than an azalea. I think this size difference was due to the fact that I used larger beads. Overall, though, I do think that the flower turned out well and I really enjoyed making this flower. The alternating technique would probably be a great way make strawberry leaves look more realistic.

Sunday, April 23, 2006

Lacing

Here is another lovely project from The Art of French Beaded Flowers by Carol Benner Doelp: the Floating Gardenia. This took quite a long time to make, particularly because I've never undertaken making so many petals before. It looks nice, but I feel like it required a little too much work. This is the first time also, that I tried lacing ("sewing" the rows of the leaf or petal together). At first I thought that it wasn't very important, but I gave it a try anyway. Well, it really makes a difference! Putting in just a little extra work has really changed how the overall product looks. I decided to try several lacing in several places on the leaf. I have pictures of both the front and the back of all five leaves. The last leaf was laced as it was made, not afterwards like the others.

Rose and Cymbidium


Here are a rose and cymbidium orchid from the Dutch book Beadflowers by Annette van Sevenhoven and Leane de Graff. The patterns in this book are very lovely. The flowers, however, aren't made like French beaded flowers, they're made using loops, which then have a strand of beads run through them to connect them or they are made using the Victorian technique (with a border). I find that this makes the petals of the flowers have quite a bit of empty space, but this makes the designs seem very airy and romantic. There are several entirely diagrammatic patterns in this book, most of which include a big and small variety. All in all it's quite a nice book.
To see more lovely flowers (and trees) made in this style, please see Ellie's photo album. There are over a hundred beautiful pictures!

Friday, February 24, 2006

Stenboden

I recently bought Hobby Models 1 and 8, published by Stenboden from Pristine's Beads, a store in Alaska. They had wonderful service; I was very pleased.
Now, about the books. They are very concise and for the most part text. So far, I have made the Crocus and Snowdrop. I am planning on making all of the examples in both books (however I will probably save the trees for last). The designs are quite pretty and unique, though sometimes it felt like they weren't explained thoroughly enough (like binding the small leaves in the Crocus). I think this is because I'm used to the books here which walk you pretty much step by step through everything. One thing I really liked though was the wrapping of the stem with wire. It really makes for a nice 'glossy' finish if you use silver plated colored wire (like on the Snowdrop).

Original Flower

This little flower is an original design. It went very quick and easy, since I used wraparound loops for the flower. The leaves were experimental. The sepals are just tubular netting. I made this in about a day (well, two actually, but that's because I can only bead in the evenings), and I didn't really feel like doing anything fancy with the stem. I hope you enjoy my work =)
I have drawn out a small pattern for this flower. I have included brief descriptions here; you will find more detailed ones when you look at the pictures. First, there are the petals and the center. The drawings show the technique involved in making them, not the number of beads. Next the leaves: these have numbered beads as they follow a specific pattern. (Click on "all sizes" to see the large version of the image. It should be directly under the name, in the upper left hand corner of the image). Finally, the sepals, which are done in two parts: part 1 and part 2. The sepals should be added on after the petals and center have been made since the tubular netting is quite tight. Then, add the leaves. Feel free to modify this pattern as you like!

Sunday, January 29, 2006

Poppy

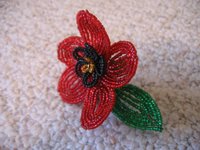
Here is my first finished flower, made using instructions from The Art of French Beaded Flowers: Creative Techniques for Making 30 Beautiful Blooms by Carol Benner Doelp. This project aims to use all four of the basic techniques: continuous loops, continuous crossover loops, continuous wraparound loops and the basic frame. Before this project, Doelp includes a history of French beaded flowers, a "basics" section, in which she talks about the different beads, wire and tools used, as well as a section devoted to the basic techniques. These are explained in detail and there is also a flower making math page, for estimating how many beads you need to complete a petal. The first project, which is the simplest, aims to give you practice with the four basic techniques. Of course, it would get pretty boring if that would be all that you'd be doing! What I love about this book is that in each project (there are 21), there is a new special technique, such as ruffling, outlining, reverse basic and many others. All of the flowers in this book look unique, not just because of the colors used or the number of
petals or leaves, but also because the techniques used to create them are unique. The first project is actually titled "Classic Poppy Pin", and calls for a pin back. I didn't really feel like doing that, and I chose instead to curl the end of the stem into a circle, so now my poppy can stand by itself.